Tuesday, 21 July 2015

Crochet Lace Motif Bolero

This is my very first Crochet Lace Motif Bolero, made with Bendigo Woollen Mills Cotton 4-ply in Blush.

Front view of crochet lace motif bolero
Crochet Lace Motif Bolero (Front)
Back view of crochet lace motif bolero
Crochet Lace Motif Bolero (Back)

I wanted something light, loose and airy, ideal to wear over a tank top in hot weather, and this bolero is perfect. The BWM cotton 4-ply is great for crochet - it produces a soft, wearable fabric with a nice drape.

This site www.jessica-tromp.nl, and this page in particular, show you different ways to construct a bolero out of motifs. At first, it looked complex and intimidating, but after a closer look, I learned that motifs are just shapes - squares, rounds, triangles etc., and lace in crochet is simply a combination of chains and basic crochet stitches. The easiest version is probably Bolero Type 5, which is what I went with for my bolero.

For the motif, I found this beautiful, elegant lace motif pattern from this site.

Crochet Lace Motif Pattern

The pieces are joined-as-you-go, so there is no need for seaming or extra stitches to join the squares.

For the edging, I used this lovely, intricate pattern from Fatima Crochet.

Crochet Lace Edging for Bolero
Crochet Lace Edging

Here is a close-up view of one of my motifs.

Close up view of the crochet lace motif square
Crochet Lace Motif Square
Two motif squares joined together
Two joined motif squares

Each square measures approximately 12 cm x 12 cm. The finished bolero is 36 cm wide, and 28 cm from top to bottom.

Monday, 25 May 2015

Crochet Mini Shell Tote

Crochet mini shoulder tote
Crochet Mini Shoulder Tote

This bag was based loosely on Tangled Happy's Spring Inspired Boutique Bags pattern. I started out with the pattern but made quite a few changes along the way. I wanted a bag that can hold things, and be carried on the shoulder - like a mini shoulder tote. So I made it bigger, added a base, and made the strap longer.

About The Pattern

The bag is crocheted in a tube, with the bottom sewn or stitched together at the at end. The shell pattern is basically constructed from multiples of 3 stitches. That forms the basis of the foundation chain - any multiple of 3. For example, a foundation chain of 99 stitches will give you 33 shells. The length of the foundation chain will form the circumference of the bag. So if you want your bag to measure 6 inches in width, the foundation chain should be at least 12 inches.

An alternative is to crochet around the foundation chain, forming the circle right from the base, thus eliminating the need to sew. Make sure the foundation chain is the length of the desired width of the bag, not the circumference.

The instructions for Round 2 of the original pattern is especially confusing.

Rnd 2: Sl St in each dc of shell into sp between first two shells. Work Beginning Shell. {Work Shell in space between next shell.} Repeat between {} to end. Join in top of ch 3. (17 Shells)

After several attempts, I think I finally decoded it. This is what I did:

*Slip stitch in the top of ch3 (of the Beginning Shell) to join the round. Then slip stitch in the next 2 dcs (of the Beginning Shell) until you reach the space between the Beginning Shell and the next Shell. Work Beginning Shell in this space --> this is the beginning shell of the new round. Then work Shell in the space between the next 2 shells, to end* At the end of round, repeat from *.

Normally when you sl st to join stitches in the round, the "seam" is formed on the same stitch column, i.e. the sl st sits on top on the sl st of the previous round. With the method above, the "seam" is more diagonal than straight as the stitches for the new round starts at the space between the first 2 shells rather than directly above the first shell.

For the base, I simply made an oblong piece of single crochets, and sc it to the bottom of the body piece.
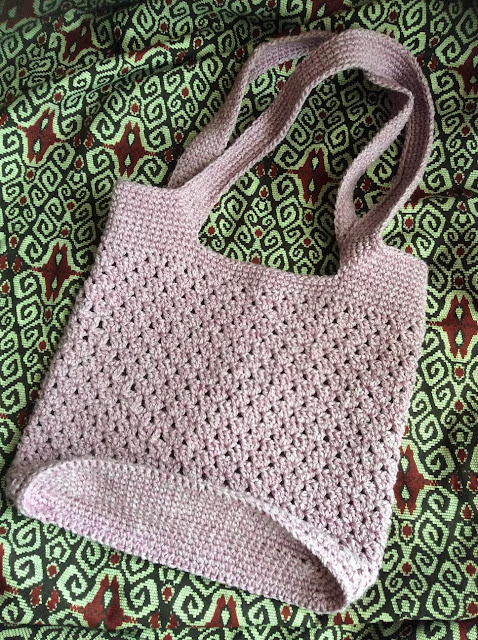
Crochet tote with oblong base
Added an oblong-shaped base
Crochet tote - close up view of the shell stitches
Shell stitches

About The Yarn
The yarn I used for this bag is Bendigo Woollen Mills Harmony in Carnation which is a cotton-wool-lycra blend. I had knitted up a top/vest with it, but frogged the whole thing soon after because I didn't like it and would never wear it. The knitted fabric was very thick and heavy, and felt rough on the skin. It didn't have the squishiness of wool nor the smoothness of cotton. Instincts led me to try Harmony on a this bag, and I loved the result! For me, this yarn is perfect for making crochet bags because it produces a thick, sturdy fabric that is essential for bags.

Crochet tote made with Bendigo Woollen Mills Harmony in Carnation
Love the bag!

From the foundation chain of 99 stitches (33 shells around), my bag measures approximately 9.5 inches wide and 8 inches from the bottom to the top center point (excluding the strap).

Friday, 10 April 2015

Chinese New Year Fondant Cupcakes

I made these marshmallow fondant cupcakes last year, for Chinese New Year 2014.

Chinese New Year cupcakes with homemade marshmallow fondant
Chinese New Year cupdakes with homemade marshmallow fondant
The cupcakes were dark chocolate cupcakes, recipe adapted from Brown Eyed Baker's Dark Chocolate Cupcakes Recipe.

Dark Chocolate Cupcake Recipe

Adapted from Brown Eyed Baker

Ingredients
113gm unsalted butter
2 oz bittersweet or semi-sweet chocolate, chopped
1/2 cup cocoa powder
3/4 cup all-purpose flour
1/2 tsp baking soda
3/4 tsp baking powder
2 eggs, room temperature
2/3 cups granulated sugar
1 tsp vanilla
1/2 tsp salt
1/2 cup sour cream

Method
  1. Preheat oven. See below for temperature and oven setting.
  2. Melt butter, chocolate and cocoa powder over simmering water. Then cool to warm-to-touch.
  3. While waiting for chocolate mixture to cool, sift flour, baking soda and baking powder in a bowl. Mix to combine.
  4. Beat the eggs with electric mixer. Add sugar, vanilla and salt. Mix till fully combined.
  5. Take the egg mixture off the mixer stand. Pour in the cooled chocolate mixture. Mix with a spatula or spoon till combined.
  6. Add 1/3 of the flour mixture, mix to combine.
  7. Add sour cream, mix to combine. It's easier to blend in the sour cream at this stage while the mixture is still quite thin.
  8. Add remaining flour mixture, mix to combine.
  9. Divide batter into cupcake casings, filling each one 1/2 full, and bake.
For regular-sized cupcakes, bake at 140°C for 18-20 minutes. The recipe yields 12 regular-sized cupcakes.

For mini cupcakes, bake at a slightly lower temperature, 130-135°C for 18 minutes. The recipe yields 24 mini cupcakes.

Oven Setting
It's important to bake cupcakes using the top and bottom heating element of the oven, instead of fan-assisted convection, and bake them in the middle rack in a single tray or layer. I've learned that using fan-assisted convection could result in cupcakes with lopsided dome tops (caused by the wind from the fan before the cupcakes fully set).

Chinese New Year cupcakes with homemade marshmallow fondant
Homemade marshmallow fondant cupcakes
The cupcakes were then frosted with a thin layer of chocolate ganache, before decorated with my homemade marshmallow fondant toppers.

Monday, 30 March 2015

Homemade Marshmallow Fondant Recipe

Don't like the taste of store-bought fondant icing? You can make your own, with just a few inexpensive ingredients. Homemade fondant tastes much better, and if you're making it for kids, you can rest assured of the ingredients that go into it and its freshness.

Making fondant at home is not hard but the process can be tedious, and daunting if you've never made it before. You will need 30 minutes to 1 hour. There will be plenty to clean up afterwards too :)

This recipe is marshmallow fondant or fondant icing made from marshmallows. It produces a very small batch, just enough to fit into a 17.7cm x 20.3cm zip lock bag. I adapted the recipe from Rhonda's Ultimate MMF on CakeCentral.

Homemade Marshmallow Fondant Recipe (Small Batch)

Ingredients
250 gm white marshmallows
1 tbs water
1/4 tsp salt
1 tsp lemon juice
3-4 cups sifted icing sugar, adjust as needed to get desired consistency
Vegetable shortening (for greasing)

If using large marshmallows, you can optionally cut them up into smaller pieces. This helps them melt faster and more uniformly.

You can optionally add extracts to flavour the fondant, like vanilla or almond extracts. If using, be sure to use clear extracts so as to not taint the colour.

Method
  1. Grease everything that will come into contact with the marshmallow, with shortening, e.g. pot, bowl, spatula, counter top, hands etc. Tip: Use paper towels to grease the utensils to avoid greasy hands in the early stage.
  2. Put the marshmallows in large bowl, pour in 1 tablespoon of water and microwave for 2 minutes, stopping every 30 seconds to stir. Or, use a stove top double boiler like I did - put the marshmallows in the double boiler with 1 tablespoon of water. 
  3. Heat and stir until completely melted. The mixture should look and feel very, very thick and sticky, almost difficult to stir, but completely melted with no lumps.
  4. Off heat, stir in lemon juice and salt.
  5. Sift icing sugar on greased counter top, make a well in the center and pour the melted marshmallow onto the sugar. 
  6. Mix and knead, add more sugar and rub on more shortening as needed, to form a dough. Be careful as the melted marshmallow will be hot initially.
The dough should feel soft but pliable, smooth and shiny. Here's a youtube video that shows the 'rightness' - when you pull it, it should stretch a little before breaking off.

Steps with Pictures

1. Using paper towels, grease the tools, utensils and work counter (where you will be kneading the fondant) with shortening.

2. Put the marshmallows in the double boiler with 1 tablespoon of water.

Put the marshmallows in the double boiler with 1 tablespoon of water

3. Heat and stir until COMPLETELY melted. It should look and feel very, very thick and sticky, almost difficult to stir, but completely melted with no lumps.


Heat the marshmallows and stir until completely melted

4. Turn off the heat. Mix in salt and lemon juice.

Off heat, stir in salt and lemon juice
Off heat, mix in salt and lemon juice

5. Grease your hands with shortening. Pour the melted marshmallow onto sifted icing sugar, and mix. Be care when it's still hot.

Mix the melted marshmallow with sifted icing sugar

6. Knead, add more sugar and rub on more shortening until you get a pliable dough.

Homemade marshmallow fondant

Colouring Fondant

Divide the fondant into portions to be coloured. It is best to use gel food colouring, like Americolor Gel Paste. Liquid colouring will affect the consistency of the fondant. The colour will deepen over time, so add the colour sparingly and a little at a time. Use a toothpick to dab on the colour, and knead until it is completed blended and even.

Dab on gel colour with a toothpick and knead till blended
Dab on gel colour with a toothpick and knead till blended.

Storing Fondant

Fondant can be left at room temperature for up to 2 weeks, or 4 weeks in the refrigerator if wrapped and stored properly. Coat the fondant with a thin layer of shortening and wrap it securely with cling wrap. Then put in a zip lock bag and store in an airtight container.

Wrap with cling wrap, put in zip lock bag and store in airtight container

Cleaning Up

Marshmallow is made mostly of sugar, which dissolves in water. So the marshmallow bits are easy to clean. Soak the utensils for a few minutes and the stuff comes right off. The shortening though, is a nightmare to clean. It takes a lot of of dish detergent and repeated washings to get that stuff off. 

Using Fondant

When ready to use, unwrap the fondant and knead until it becomes pliable again, or microwave it for 2 to 5 seconds, depending on the amount. Grease your hands, work top and all your fondant shaping tools with shortening. Then roll out, cut out, shape, etc. as needed.


Monday, 16 March 2015

Chocolate Ganache Recipe

Ganache is simply melted chocolate and cream. It can be made with different types of chocolate - dark, white, semi-sweet, bittersweet, milk etc. It is very easy to make, and you can get different 'products' out of the simple mixture. Basically, the cream is heated and then poured over the chocolate. The mixture is then left to infuse, and then gently mixed into a smooth, velvety, thin chocolate sauce. If you let it cool for a few hours in the refrigerator, the mixture thickens into a beautiful spreadable or piping consistency, like peanut butter. It can also be whipped up into a lovely soft mousse. There are many variations and there is no "right" consistency; use what works for you.

Chocolate Ganache Recipe

Ingredients
Chopped Dark / Semi-sweet / Bittersweet / White / Milk / Any Chocolate
Whipping cream

For dark chocolate ganache, use 2:1 ratio, that is, 2 parts chocolate to 1 part cream. E.g. if using 8 oz chocolate, use 4 fl. oz cream.

For white chocolate ganache, use 3:1 ratio, and for milk chocolate, somewhere between the two.

You can use chocolate chips or buttons or bar. If using the bar, chop it up finely - easier for the chocolate to melt. The whipping cream must be in liquid, unwhipped form, not the ready-whipped stuff that comes in a canister.

Method
  1. Put the cream in a saucepan, and the chocolate in a bowl.
  2. Heat the cream until just boil.
  3. Turn off heat, and pour the hot cream onto the chocolate.
  4. Let it sit for 5 minutes to melt and infuse.
  5. Stir gently until the chocolate is completed melted, no lumps and the mixture is combined.
Chocolate ganache, after 3 hours in the fridge