 |
| Tapestry Crochet Water Bottle Carrier / Holder |
 |
| Tapestry Crochet Water Bottle Bag |
There are 3 parts of construction - the bag bottom, the bag body and the bag strap, each with its own pattern. The bag bottom and body are crocheted in one piece, in single crochet spiral (in the round without joining), starting at the bottom. The strap is crocheted separately and sewn to the finished bag.
The Bag Bottom
The bag bottom is basically a flat circle.
- A flat circle is typically made up of 6, 8 or 12 sections. For a 6-section circle, start the circle with 6 stitches and increase 6 stitches evenly every round. If you increase at the same spot every round, you effectively get a hexagon, i.e. a piece with 6 equal sections. Accordingly, if you start with 8 stitches and apply the same formula of increasing 8 stitches evenly every round, you get a octagon. That's the formula for making a flat circle.
- But you can actually start with any number of stitches as long as it works to make the piece lay flat. Tension, needle size, yarn type and stitch height play a part in this - using too few stitches can cause the piece to curve, forming a dome, while too many can cause puckering. The more yarns carried, the taller the stitches will be, and taller stitches tend to require more stitches. Test and see what works best. There are no rules.
- To make the shape more circular than angular, don't increase at the same spot every round. Instead, adjust and change/shift the point of increase in each round, so that the increases don't sit directly on top of each other.
- The diameter of the bag bottom should be slightly bigger than the diameter of its intended bottle, at least 1-2 cm. As the bottom piece curves upward and forms the body piece, the effective diameter shrinks a little. How much allowance to give it depends on how snug you want the fit to be. I tend to go for a looser fit, and have a bag that fits rather than risk one that doesn't, after all the time and effort put in.
- When you finish the bottom piece, the total number of stitches will be the product of the number of starting stitches and the number of rounds. For example, if you start with 8 stitches and work 12 rounds, you will have 96 stitches in the last round.
- Depending on the pattern for the bag body, you may need to increase stitches after the last round, to meet the number stitches required for the pattern. I call this round the transitional round. For example, if you have 96 stitches after finishing the bag bottom, and the bag body calls for 104 stitches (for example, 4 repeats of a 26-stitch pattern), increase 8 stitches evenly in the transitional round.
- I like to start carrying the yarns from round 2. That is, after the magic circle (which is also the first round), I start carrying the yarns. This is so that the stitches' height and fabric thickness are even throughout. The more yarns you carry, the taller the stitches and the thicker the fabric will be.
- Because the piece is crocheted spirally in the round, color changes may result in color jogs. In some patterns, this can be hidden or masked by making some adjustments to the pattern or choosing a point in the pattern as the start/end of round so that the color change appear intentional. But if the color jog doesn't bother you, it doesn't matter :)
The Bag Body
Crocheting the bag body is virtually a no-brainer. After completing the bag bottom and the transitional round, if required, simply continue working the same number of stitches every round, in single crochet spiral, following the pattern for the bag body, until you reach the desired height for the bag.
For me, the one challenge in making the bag body has been adjusting the pattern to minimize color jogs that make the pattern appear "broken".
See this.
 |
| Color jog makes the pattern appear broken |
I have since learned of ways to work around the problem, though it took me quite a while to wrap my head around them. Even now, I still learn every time I make a piece. Sometimes, I work it out on paper or with software before I start. Other times, I just take a leap of faith and work it out as I go.
To finish the body, you can add some decorative rows like shells or picots, or just keep it plain.
The Bag Strap
The bag strap is basically a long, flat rectangle or oblong/oval. In order for the stitches to appear uniform i.e. all same-side stitches appear on one side, I do either of these, depending on the pattern.
- Crochet a very long oblong/oval. After the foundation chain, continue working down the chain on the opposite side, without turning. In each round, I add 3 or more stitches evenly at each end of the strap.
- Crochet a very long rectangle. I start with the single crochet foundation stitch chain. The next row and all subsequent rows are crocheted from the same side of the strap. At the end of each row, the yarn is cut. Yes, there is a helluva lot of yarn ends to clean up :(
The finished strap is sewn to the top of the bag body.
 |
| Water bottle holder with strap |
Making the long bag strap is, by far, the part I enjoy the least in making a tapestry crochet bag. The long foundation chain is a pain to count, and the many pattern repeats agonizingly monotonous. I have yet to find a workable, happy alternative.
Many of the beautiful bag straps (of the Wayuu Mochila) that I see on the web are woven using some sort of loom, or braided, e.g. ply-split braiding. These processes seem tedious and time-consuming but they do yield beautiful, sturdy straps.
Patterns
Despite the multi-color look, only 3 yarns are used at any one time - one working yarn and 2 carried yarns. This is maintained throughout the piece to ensure even thickness.
Bag Bottom
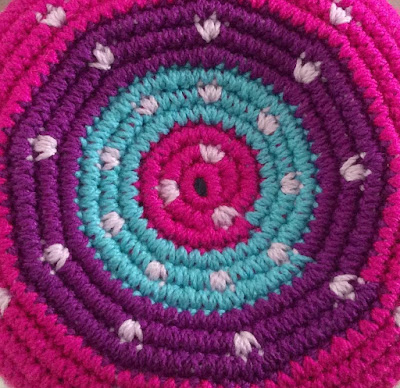
The bottom is a nonagon, i.e. 9-sided polygon. I start with the magic circle with 9 stitches, and increase 9 stitches evenly every round for 13 rounds - 117 stitches. In the transitional round, I increase 3 stitches evenly, to get 120 stitches.
 |
| Bag bottom pattern |
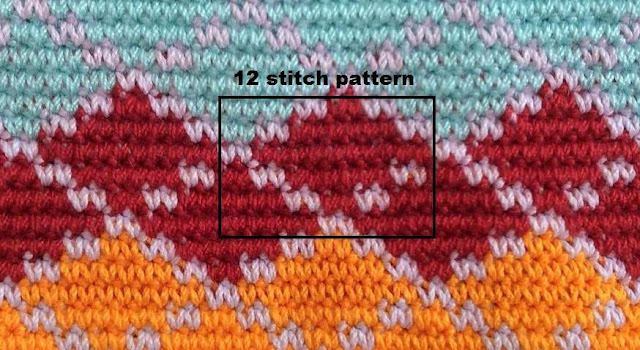
Work 10 repeats of the 12-stitch pattern - 120 stitches.
 |
| Bag body pattern |
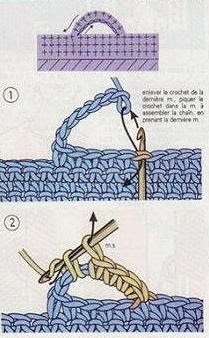
I use this buttonhole technique to make the eyelets. It doesn't leave any of the carried yarns exposed, like those that involve making chains and skipping stitches do. All carried yarns are nicely hidden under the single crochets.
 |
| Crochet buttonhole / eyelet |
Some Helpful Links:
- Tapestry Crochet - how to crochet : https://www.anniescatalog.com/crochet/content.html?content_id=625
- Tapestry Crochet - more techniques and variations : http://www.tapestrycrochet.com/blog/?cat=18
- A Wayuu Mochila Tutorial (in Spanish)


Beautiful work.
ReplyDeleteThis comment has been removed by a blog administrator.
ReplyDeleteI examine your blog site presently share great information right below. Shoulder Strap
ReplyDeletewelldone
ReplyDelete