Sunday, 25 September 2016

Crochet / Amigurumi Pikachu & Pokéball

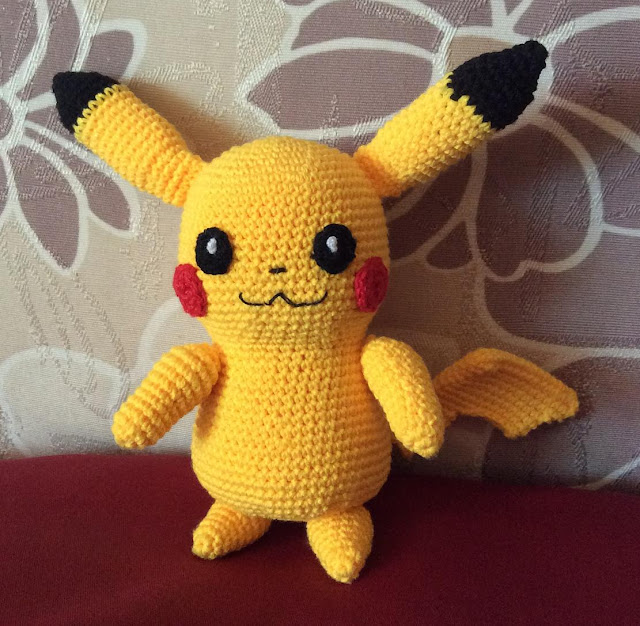
Jumping on the Pokémon Go craze bandwagon,  I made these amigurumi Pokémon toys :)

Amigurumi Pokémon toys
Amigurumi Pokémon toys

Crochet Pikachu and Pokéball


Pikachu is based on this amigurumi Pikachu pattern from Sabrina's Crochet. It makes a decent size - big enough as a toy (I can hold the body in my hand) and small enough for the work to be completed in a day or two. I followed the pattern for the head, body, limbs and ears, but crocheted the tail in the round instead of making 2 separate pieces and sewing them together, following the pattern just roughly. The other small details like eyes, cheeks, nose and mouth were made to fit. Love how it turned out :)

The Pokéball is basically a sphere. I used this Ideal Crochet Sphere that truly creates the perfect sphere! Mine is the 30-row ball that turned out a little smaller than a tennis ball. Perfect size for kids to grasp and throw at Pikachu, poor thing :)


Crochet Pikachu toy
Crochet Pikachu toy

Crochet Pikachu toy - back view

Pikachu and Pokéball

Wednesday, 24 August 2016

First Sewing Project - Tote with Welt Pocket and Recessed Zipper

I just finished my first sewing project - this Owl Tote.
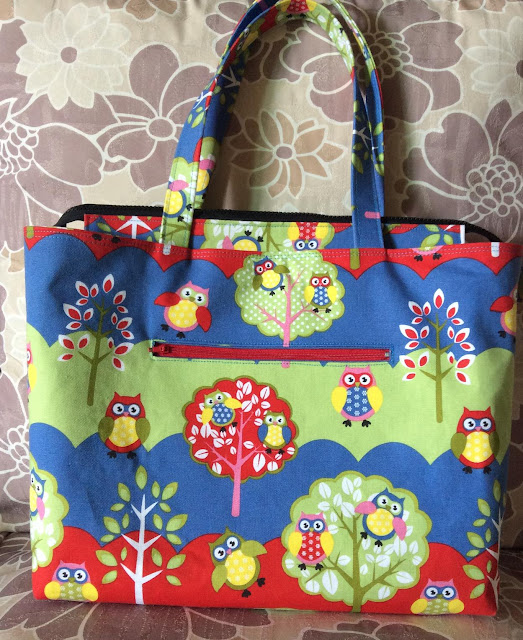
Lined boxed-corner tote with recessed zipper

Not bad considering it was my first big sewing project, and that I'm new to machine sewing :)

The bag is basically a boxed-corner bag with lining. I added welt pockets and a recessed zipper just to make the work a little more interesting.

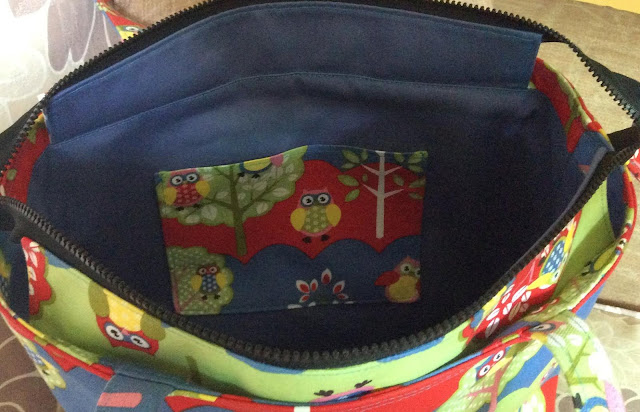
Interior welt pocket

Interior open pocket

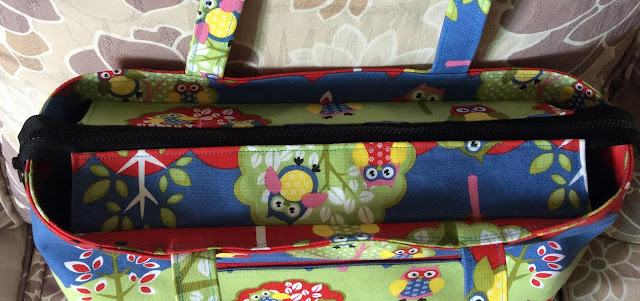
Recessed zipper, with extended zipper on both ends for a wide opening

There are many tutorials out there on DIY bag making/sewing. These are the ones that I find particularly helpful in making this bag.


On Bag Making Process

ikatbag.com - I am so grateful for this wonderful site by LiEr, the author. She wrote a whole series on bag making! The series is great for understanding bag construction and how to approach sewing a bag by yourself. You can find it at The Bag Tutorials located at the side panel of the site and navigate from there. Or go straight to the Blog Archive of January 2013 when the first post in the series was written.


Sewing a Boxed-corner Tote with Lining and Zipper

I basically based my bag on this video tutorial by Debbie Shore. She shows the different pieces of a basic lined, boxed-corner tote and how they are sewn together. Very easy to follow.


Welt Pocket

How to add a zipper pocket to any purse pattern by So Sew Easy.
Simple instructions with helpful tips. I particularly like that it shows a few variations, all well explained.


Bag Straps 

Sew Perfect Fabric Bag Straps by Sewplicity - For simple and basic bag straps.

ikatbag.com has a full chapter on bag straps as well, with some more advanced techniques.


Recessed Zipper

How to sew a recessed zipper on a bag by So Sew Easy - Clear instructions and very easy to follow. There's a video tutorial as well. Debbie Shore's tote bag video tutorial includes sewing the recessed zipper but I find it quicker to refer to this one as it is only about creating the zipper panels and sewing them to the bag.


Zipper Tabs

My oh my... these tiny, seemingly easy pieces are the most finicky! I was finally satisfied with the ones made by following this tutorial from Sew4Home. I also took the time to hand-baste the whole thing before sewing - helped a lot!


Bag Bottom

I contemplated adding a bag bottom insert to strengthen the bottom but decided to go ahead without one (for now), because I didn't want to "waste" a piece of my very precious stiff interfacing. Bag interfacing is so expensive and so hard to come by here. But if I had, I was going to follow this tutorial by You SEW Girl which uses Peltex. Some other options would include using thin plastic crafting sheets (available at local craft stores), thin plastic cutting boards (i.e. available at Daiso), reuse/recycle bag bottoms from old bags. I figure I can always make a separate insertable/removable piece in the future, if the need arises. Anyway, we'll see how the bag holds up to wear and tear without one.

My Bag Pattern / Dimensions
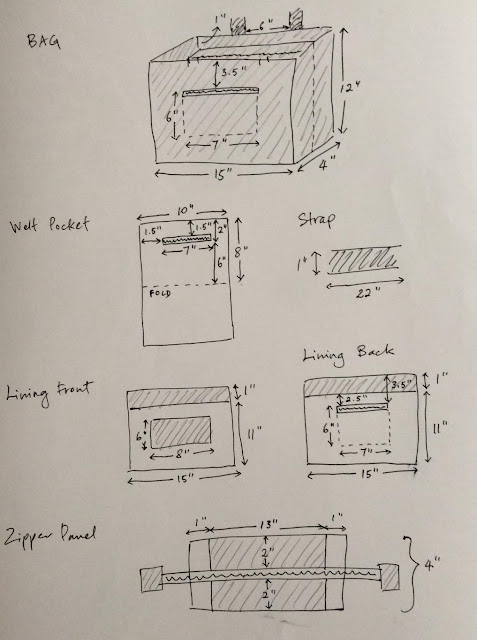
Bag pattern / dimensions


My goal is to have a bag that is 15" wide, 12" tall and 4" deep, with straps that would enable the bag to be carried on the shoulder - about 22" long. Pockets and other dimensions are then worked out from these decisions.

I use 1/2" seam allowance on all pieces. The dimensions of the pieces below take this seam allowance into account.

Bag Exterior (front & back) : 
Exterior Fabric 20" x 15" (x 2 pieces)

Front Welt Pocket:
7" zipper
Lining Fabric 10" x 16"

Bag Interior (front & back):
The interior is divided into 2 sections - the main lining body and the top 1 inch that goes above the zipper panel. For aesthetic reasons, I use exterior fabric for the top 1 inch and lining fabric for the main body.

Exterior Fabric 20" x 2" (x 2 pieces)
Lining Fabric 20" x 14" (x 2 pieces)

Interior Front Open Pocket
To add aethestic interest, I use exterior fabric for the front side of the open pocket, and lining fabric for the inside portion. The exterior fabric is also cut a little longer than the lining fabric, so that it extends about 1/2" toward the inside of the pocket.

Exterior Fabric 9" x 8"
Lining Fabric 9" x 6"

Interior Back Welt Pocket
7" zipper
Lining Fabric 10" x 16"

Zipper Panel
19"/20" zipper
Exterior Fabric (top side of panel) 14" x 3" (x 2 pieces)
Lining Fabric (bottom side of panel) 14" x 3" (x 2 pieces)

Bag Straps
Exterior Fabric 4" x 22" (x 2 pieces)

Zipper Tabs
Exterior Fabric 4" x 2.5" (x 2 pieces)

For exterior fabric, I use home decor weight fabric, with thick fusible interfacing.
For lining, I use medium weight cotton fabric, with medium fusible interfacing.

After completing the outer bag and lining, trim off all seam allowances to 1/4" or less. There is quite a lot of bulk especially the part where the zipper panel is sewn to the bag lining.


Sunday, 17 July 2016

Tapestry Crochet Water Bottle Carrier

Here's another water bottle carrier that I crocheted using the Tapestry Crochet method.

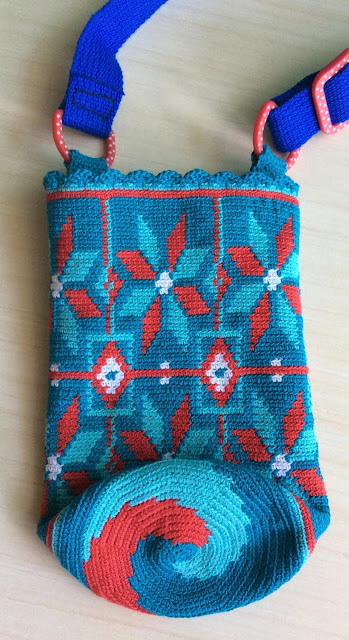
Tapestry Crochet Water Bottle Carrier
Close-up view of Tapestry Crochet Water Bottle Carrier
Close-up view

I've written about the construction of my water bottle carrier/holder in a previous post here.

Pattern Summary


Bag Bottom

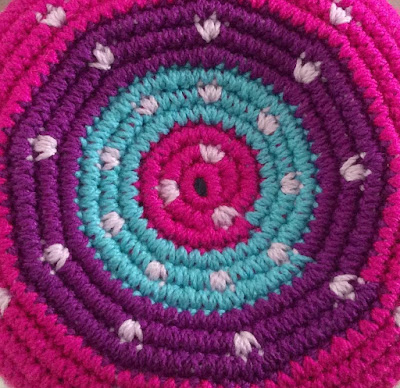
For this bag, I chose a simple 3-color spiral pattern for the bag bottom.

3-color spiral pattern for bag bottom
Start with the magic circle with 9 stitches and increase 9 stitches every round for 13 rounds, for a total of 117 stitches. In the following transitional round, increase 3 stitches evenly for a total of 120 stitches.


Bag Body

The bag body is simply 5 repeats of this 24-stitch pattern. Total 120 stitches per round.

24-stitch repeat bag body pattern
The top of the bag is finished with a round of decorative shells.

Bag Strap

To save time, I bought a length of blue webbing, a pair of D-rings and a slider from Daiso :) I crocheted 2 small rectangle pieces to attach the D-rings to each side of the bag. The use of the slider makes the strap adjustable!

Crochet water bottle carrier

More information about the construction of the water bottle carrier here.

Tuesday, 14 June 2016

Crochet Granny Square Bag

This is a crochet granny square bag that I made some time ago.

Crochet granny square bag
Granny squares are marvelous. They are small, quick and fun to make. You can virtually mix and match any color combination. There is a myriad of granny square pattern resources on Pinterest and other craft sites. It's also easy to create your own.
Crochet granny square bag
Crochet granny square bag - other side

Bag Construction

Any number of squares can be used, depending on the size of you want to build. I used 35 pieces of granny squares for this bag. 
  • 12 each for the front and back panels
  • 4 for each side panel
  • 3 for bottom panel
(12 x 2) + (4 x 2) + 3 = 35

I alternated between dark purple and light purple pieces, and made sure the colors lined up before sewing/joining. Laying them out also helped to determine what colors to use to make next square.

Lay out the granny squares on the floor
Lay out the granny squares
  1. First, sew/join the pieces for the front panel. The front panel is constructed from (3 x 4) pieces of squares. Here, I joined the squares with single crochets on the wrong side, so that the seam doesn't show and appears invisible on the right side. 
  2. Repeat for the back (or other) panel
  3. Next, join the 4 squares for the side panel, continuing with the 3 bottom squares, and the 4 squares of the other side panel, so that you get a long strip of squares in (11 x 1) layout. 
  4. Sew the front panel to the side+bottom piece from step (3), going from the top down to the bottom corner, across the bottom, and back up to the top on the other side. Here, I used single crochets on the right side, so as to give the right side seam a prominent and visible "corner".
  5. Repeat for the other panel.
  6. Finish the top with some decorative picots.
  7. Attach bag straps and lining, and it's good to go!

Colorful crochet granny square bag

Monday, 30 May 2016

Tapestry Crochet - Mini iPad Sleeve

I like my mini iPad as it is - bare, without any casing. I like to be able to comfortably hold it in one hand, as I would a Kindle or a paperback, and many of the covers out there just add to its weight. Without a fixed casing though, I do need a bag/holder/sleeve to prevent scratches and snags when I carry it in my purse.

This is my mini iPad sleeve that I crocheted using the Tapestry Crochet method. The pattern and colours were inspired by designs of the native Iban tribe of Sarawak, the Malaysian state on Borneo island.

Tapestry crochet mini iPad holder, inspired by designs of the Iban tribe of Sarawak

Mini iPad Sleeve Pattern

The pattern is 77 stitches wide. For my gauge, I repeated the pattern twice for a total of 154 stitches, for the circumference of the sleeve.

77-stitch mini iPad sleeve pattern
My 77-stitch mini iPad sleeve pattern
Sarawak inspired tapestry crochet pattern

I added a few rows before I started on the pattern because I underestimated my row gauge. The piece turned out taller than expected, and those rows at the bottom were unnecessary.

I finished it with a simple button hole and a button at the top. I also attached a tiny handle at the bottom, for gripping the piece when removing the iPad.

Tapestry crochet mini iPad holder

Wednesday, 2 March 2016

Tapestry Crochet - Water Bottle Carrier / Holder

This is my tapestry crochet water bottle carrier, inspired by the Wayuu Mochila.

Tapestry Crochet Water Bottle Carrier / Holder
Tapestry Crochet Water Bottle Holder
Tapestry Crochet Water Bottle Bag

There are 3 parts of construction - the bag bottom, the bag body and the bag strap, each with its own pattern. The bag bottom and body are crocheted in one piece, in single crochet spiral (in the round without joining), starting at the bottom. The strap is crocheted separately and sewn to the finished bag.

The Bag Bottom


The bag bottom is basically a flat circle.
  • A flat circle is typically made up of 6, 8 or 12 sections. For a 6-section circle, start the circle with 6 stitches and increase 6 stitches evenly every round. If you increase at the same spot every round, you effectively get a hexagon, i.e. a piece with 6 equal sections. Accordingly, if you start with 8 stitches and apply the same formula of increasing 8 stitches evenly every round, you get a octagon. That's the formula for making a flat circle.
  • But you can actually start with any number of stitches as long as it works to make the piece lay flat. Tension, needle size, yarn type and stitch height play a part in this - using too few stitches can cause the piece to curve, forming a dome, while too many can cause puckering. The more yarns carried, the taller the stitches will be, and taller stitches tend to require more stitches. Test and see what works best. There are no rules.
  • To make the shape more circular than angular, don't increase at the same spot every round. Instead, adjust and change/shift the point of increase in each round, so that the increases don't sit directly on top of each other.
  • The diameter of the bag bottom should be slightly bigger than the diameter of its intended bottle, at least 1-2 cm. As the bottom piece curves upward and forms the body piece, the effective diameter shrinks a little. How much allowance to give it depends on how snug you want the fit to be. I tend to go for a looser fit, and have a bag that fits rather than risk one that doesn't, after all the time and effort put in.
  • When you finish the bottom piece, the total number of stitches will be the product of the number of starting stitches and the number of rounds. For example, if you start with 8 stitches and work 12 rounds, you will have 96 stitches in the last round. 
  • Depending on the pattern for the bag body, you may need to increase stitches after the last round, to meet the number stitches required for the pattern. I call this round the transitional round. For example, if you have 96 stitches after finishing the bag bottom, and the bag body calls for 104 stitches (for example, 4 repeats of a 26-stitch pattern), increase 8 stitches evenly in the transitional round.
  • I like to start carrying the yarns from round 2. That is, after the magic circle (which is also the first round), I start carrying the yarns. This is so that the stitches' height and fabric thickness are even throughout. The more yarns you carry, the taller the stitches and the thicker the fabric will be.
  • Because the piece is crocheted spirally in the round, color changes may result in color jogs. In some patterns, this can be hidden or masked by making some adjustments to the pattern or choosing a point in the pattern as the start/end of round so that the color change appear intentional. But if the color jog doesn't bother you, it doesn't matter :)
Tapestry crochet bag bottom
My bag bottom is a 9-sided polygon a.k.a. nonagon

The Bag Body


Crocheting the bag body is virtually a no-brainer. After completing the bag bottom and the transitional round, if required, simply continue working the same number of stitches every round, in single crochet spiral, following the pattern for the bag body, until you reach the desired height for the bag.

For me, the one challenge in making the bag body has been adjusting the pattern to minimize color jogs that make the pattern appear "broken".

See this.
Color jog in spiral crochet
Color jog makes the pattern appear broken

I have since learned of ways to work around the problem, though it took me quite a while to wrap my head around them. Even now, I still learn every time I make a piece. Sometimes, I work it out on paper or with software before I start. Other times, I just take a leap of faith and work it out as I go.

To finish the body, you can add some decorative rows like shells or picots, or just keep it plain.

Eyelets for the drawstring and picot finish
I added eyelets for drawstring and finished with picots

The Bag Strap


The bag strap is basically a long, flat rectangle or oblong/oval. In order for the stitches to appear uniform i.e. all same-side stitches appear on one side, I do either of these, depending on the pattern.
  1. Crochet a very long oblong/oval. After the foundation chain, continue working down the chain on the opposite side, without turning. In each round, I add 3 or more stitches evenly at each end of the strap. 
  2. Crochet a very long rectangle. I start with the single crochet foundation stitch chain. The next row and all subsequent rows are crocheted from the same side of the strap. At the end of each row, the yarn is cut. Yes, there is a helluva lot of yarn ends to clean up :(
Thin/narrow straps tend to curl and stretch. To minimize curling, I carry yarns along even when color changes are not required. This also helps to make the strap thicker and sturdier.

The finished strap is sewn to the top of the bag body.

Water bottle holder and strap
Water bottle holder with strap

Making the long bag strap is, by far, the part I enjoy the least in making a tapestry crochet bag. The long foundation chain is a pain to count, and the many pattern repeats agonizingly monotonous. I have yet to find a workable, happy alternative.

Many of the beautiful bag straps (of the Wayuu Mochila) that I see on the web are woven using some sort of loom, or braided, e.g. ply-split braiding. These processes seem tedious and time-consuming but they do yield beautiful, sturdy straps.


Patterns


Despite the multi-color look, only 3 yarns are used at any one time - one working yarn and 2 carried yarns. This is maintained throughout the piece to ensure even thickness.

Bag Bottom
The bottom is a nonagon, i.e. 9-sided polygon. I start with the magic circle with 9 stitches, and increase 9 stitches evenly every round for 13 rounds - 117 stitches. In the transitional round, I increase 3 stitches evenly, to get 120 stitches.

Bag bottom pattern
Bag bottom pattern

Bag Body
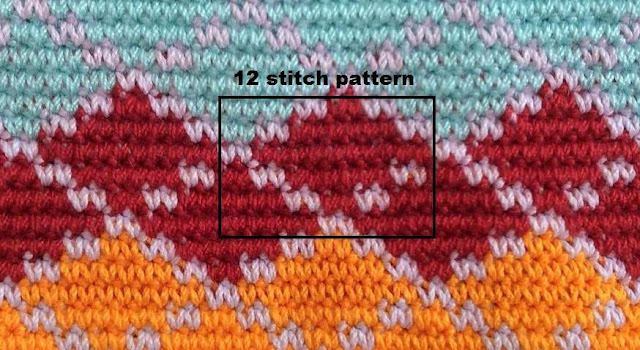
Work 10 repeats of the 12-stitch pattern - 120 stitches.

Bag body pattern
Bag body pattern

Eyelets
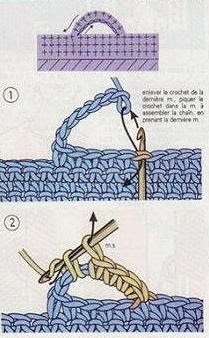
I use this buttonhole technique to make the eyelets. It doesn't leave any of the carried yarns exposed, like those that involve making chains and skipping stitches do. All carried yarns are nicely hidden under the single crochets.

Crochet button hole / eyelet
Crochet buttonhole / eyelet

Some Helpful Links:

Tuesday, 23 February 2016

First Adventures in Tapestry Crochet

Tapestry Crochet is a crochet technique where one or more yarns are carried while one is crocheted. The resulting fabric looks woven and is very thick and sturdy; and stitches are compact and strong. The craft is so versatile with endless design possibilities. Many intricate and complex patterns belie the simplicity of their execution. Often, and at its most basic, the only stitch involved is the single crochet stitch (there are variations as well). Carol Ventura's Tapestry Crochet site has history, discoveries, tutorials and everything you need to know about the art.

First Tapestry Crochet Project - The Coin Purse

As with many first time Tapestry Crocheters, I started out with the tutorials on www.tapestrycrochet.com. I find small coin purses ideal as first projects - they can be completed in a short time, and if you make a mistake, it's quick enough to unravel and redo without losing your mind :) Plus, at the end of it, you have a purse that you can use.

My first coin purse projects.

Tapestry Crochet Coin Purses
The Green and White Purse was done in the standard single crochet stitch, i.e. through both loops. This technique produces stitches that slant or lean slightly, hence the resulting pattern also slants. As I am right handed, my stitches slant to the right.

The Red and White Hearts Purse was done mostly in single crochets through the back loop only (BLO). This technique produces straight stitches but the resulting fabric has a different look and feel - if you look closely, there is a horizontal "line" that runs along every row, which also gives the fabric a rougher feel. This is because stitches are done through the back loop only, which leaves the front loop unworked - this unworked loop forms the "line".

On the heart motifs, I also experimented with a combination of the standard single crochet and single crochet through BLO. I had read about this simple yet brilliant technique here. It truly is a clever way to produce smoother outlines for motifs.

Standard Single Crochet v Single Crochet Through Back Loop Only

When I first started doing tapestry crochet, I had a hard time accepting the BLO pieces. They seemed to lack the smoothness and uniformity of the standard SC pieces. But I hated that the patterns in my SC pieces always slant, which is a problem especially with geometric/symmetrical patterns.

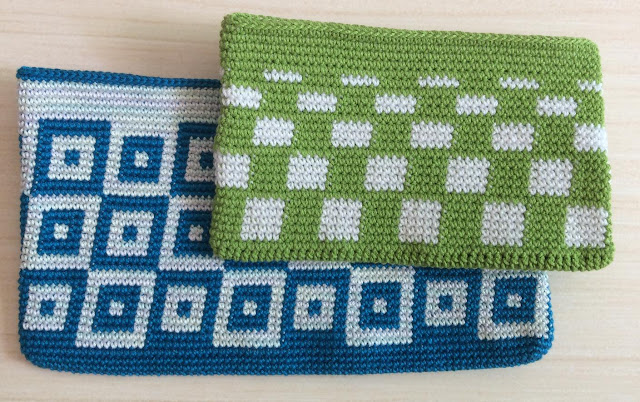
Blue purse and green purse with slanted patterns
Purses made in standard single crochet - the patterns lean/slant 
Over time, I learned to crochet the BLO very tightly and using smaller needles. The result has been encouraging. My BLO pieces are now uniform and straight, and I love them!

Sample piece made in single crochet through back loop only
Still, I think some patterns look better in the standard single crochet while others look better in the BLO. It's really a matter of preference and taste.

Wayuu Mochila Bags

Wayuu Mochila Bags
Wayuu Mochila Bags
My venture into the world of tapestry crochet led me to these beautiful Wayuu Mochila bags. These vibrant and colorful tapestry crochet bags are handmade by the Wayuu people of Colombia and Venezuela. There are usually 3 distinctive parts/patterns of the bag - the bottom, the body and the strap.

Here's a YouTube video about the Wayuu Mochila Bags and how they are made: https://www.youtube.com/watch?v=pV1mjpWjugs.

Aren't they gorgeous?