Showing posts with label Crochet. Show all posts

Sunday, 25 September 2016

Crochet / Amigurumi Pikachu & Pokéball

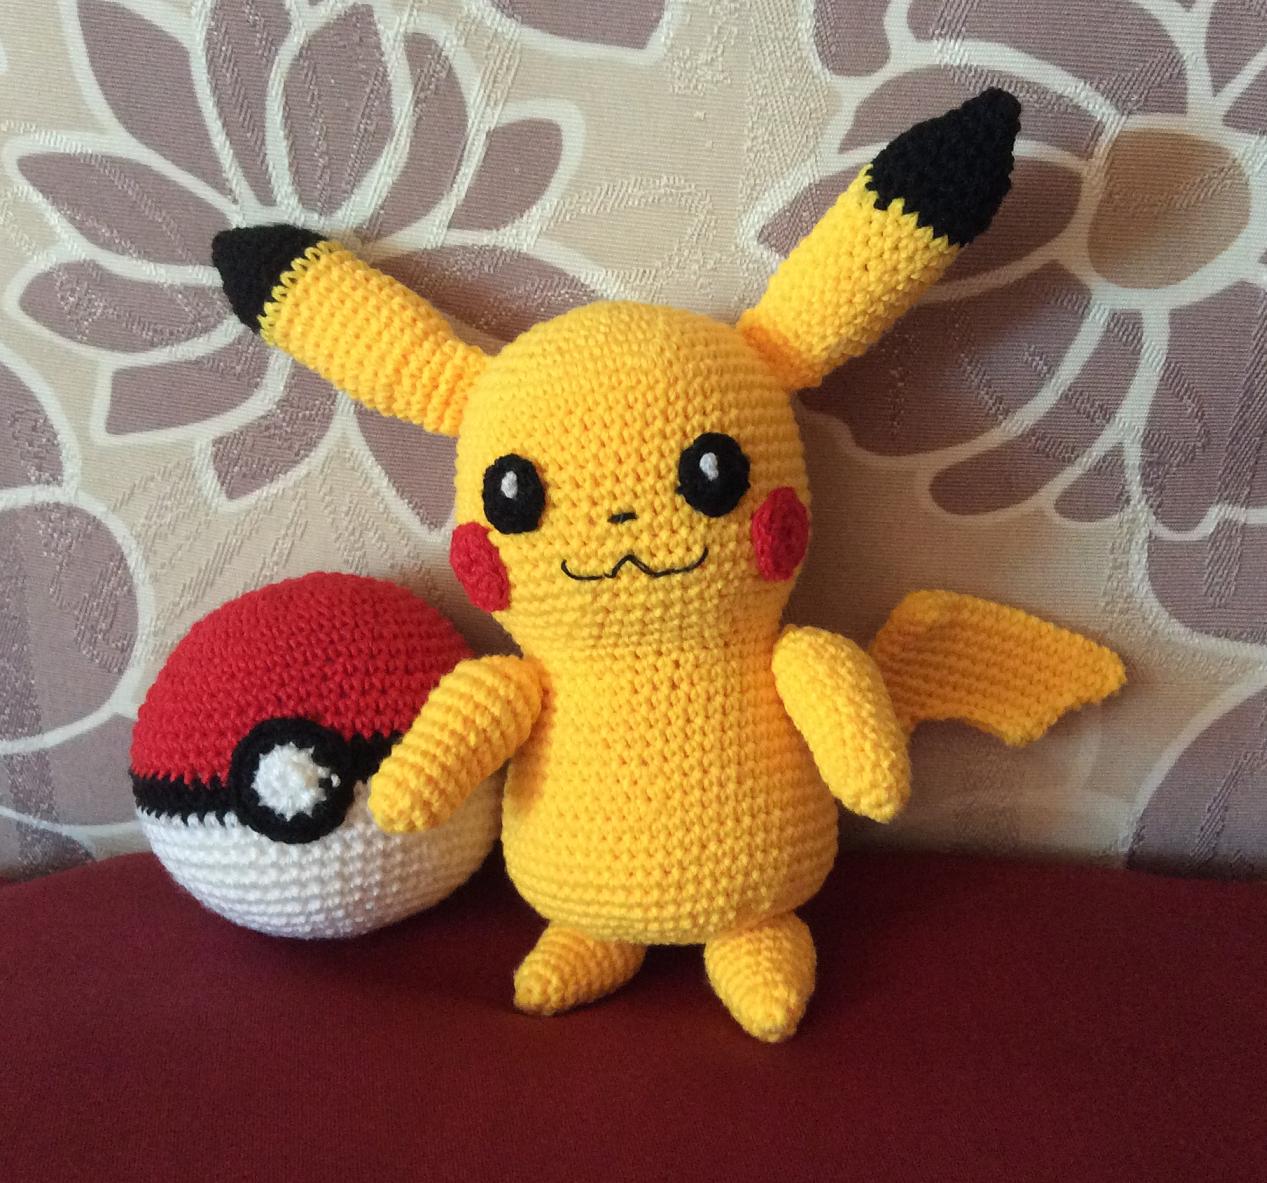
Jumping on the Pokémon Go craze bandwagon,  I made these amigurumi Pokémon toys :)

Amigurumi Pokémon toys
Amigurumi Pokémon toys

Crochet Pikachu and Pokéball


Pikachu is based on this amigurumi Pikachu pattern from Sabrina's Crochet. It makes a decent size - big enough as a toy (I can hold the body in my hand) and small enough for the work to be completed in a day or two. I followed the pattern for the head, body, limbs and ears, but crocheted the tail in the round instead of making 2 separate pieces and sewing them together, following the pattern just roughly. The other small details like eyes, cheeks, nose and mouth were made to fit. Love how it turned out :)

The Pokéball is basically a sphere. I used this Ideal Crochet Sphere that truly creates the perfect sphere! Mine is the 30-row ball that turned out a little smaller than a tennis ball. Perfect size for kids to grasp and throw at Pikachu, poor thing :)


Crochet Pikachu toy
Crochet Pikachu toy

Crochet Pikachu toy - back view

Pikachu and Pokéball

Sunday, 17 July 2016

Tapestry Crochet Water Bottle Carrier

Here's another water bottle carrier that I crocheted using the Tapestry Crochet method.

Tapestry Crochet Water Bottle Carrier
Close-up view of Tapestry Crochet Water Bottle Carrier
Close-up view

I've written about the construction of my water bottle carrier/holder in a previous post here.

Pattern Summary


Bag Bottom

For this bag, I chose a simple 3-color spiral pattern for the bag bottom.

3-color spiral pattern for bag bottom
Start with the magic circle with 9 stitches and increase 9 stitches every round for 13 rounds, for a total of 117 stitches. In the following transitional round, increase 3 stitches evenly for a total of 120 stitches.


Bag Body

The bag body is simply 5 repeats of this 24-stitch pattern. Total 120 stitches per round.

24-stitch repeat bag body pattern
The top of the bag is finished with a round of decorative shells.

Bag Strap

To save time, I bought a length of blue webbing, a pair of D-rings and a slider from Daiso :) I crocheted 2 small rectangle pieces to attach the D-rings to each side of the bag. The use of the slider makes the strap adjustable!

Crochet water bottle carrier

More information about the construction of the water bottle carrier here.

Tuesday, 14 June 2016

Crochet Granny Square Bag

This is a crochet granny square bag that I made some time ago.

Crochet granny square bag
Granny squares are marvelous. They are small, quick and fun to make. You can virtually mix and match any color combination. There is a myriad of granny square pattern resources on Pinterest and other craft sites. It's also easy to create your own.
Crochet granny square bag
Crochet granny square bag - other side

Bag Construction

Any number of squares can be used, depending on the size of you want to build. I used 35 pieces of granny squares for this bag. 
  • 12 each for the front and back panels
  • 4 for each side panel
  • 3 for bottom panel
(12 x 2) + (4 x 2) + 3 = 35

I alternated between dark purple and light purple pieces, and made sure the colors lined up before sewing/joining. Laying them out also helped to determine what colors to use to make next square.

Lay out the granny squares on the floor
Lay out the granny squares
  1. First, sew/join the pieces for the front panel. The front panel is constructed from (3 x 4) pieces of squares. Here, I joined the squares with single crochets on the wrong side, so that the seam doesn't show and appears invisible on the right side. 
  2. Repeat for the back (or other) panel
  3. Next, join the 4 squares for the side panel, continuing with the 3 bottom squares, and the 4 squares of the other side panel, so that you get a long strip of squares in (11 x 1) layout. 
  4. Sew the front panel to the side+bottom piece from step (3), going from the top down to the bottom corner, across the bottom, and back up to the top on the other side. Here, I used single crochets on the right side, so as to give the right side seam a prominent and visible "corner".
  5. Repeat for the other panel.
  6. Finish the top with some decorative picots.
  7. Attach bag straps and lining, and it's good to go!

Colorful crochet granny square bag

Wednesday, 2 March 2016

Tapestry Crochet - Water Bottle Carrier / Holder

This is my tapestry crochet water bottle carrier, inspired by the Wayuu Mochila.

Tapestry Crochet Water Bottle Carrier / Holder
Tapestry Crochet Water Bottle Holder
Tapestry Crochet Water Bottle Bag

There are 3 parts of construction - the bag bottom, the bag body and the bag strap, each with its own pattern. The bag bottom and body are crocheted in one piece, in single crochet spiral (in the round without joining), starting at the bottom. The strap is crocheted separately and sewn to the finished bag.

The Bag Bottom


The bag bottom is basically a flat circle.
  • A flat circle is typically made up of 6, 8 or 12 sections. For a 6-section circle, start the circle with 6 stitches and increase 6 stitches evenly every round. If you increase at the same spot every round, you effectively get a hexagon, i.e. a piece with 6 equal sections. Accordingly, if you start with 8 stitches and apply the same formula of increasing 8 stitches evenly every round, you get a octagon. That's the formula for making a flat circle.
  • But you can actually start with any number of stitches as long as it works to make the piece lay flat. Tension, needle size, yarn type and stitch height play a part in this - using too few stitches can cause the piece to curve, forming a dome, while too many can cause puckering. The more yarns carried, the taller the stitches will be, and taller stitches tend to require more stitches. Test and see what works best. There are no rules.
  • To make the shape more circular than angular, don't increase at the same spot every round. Instead, adjust and change/shift the point of increase in each round, so that the increases don't sit directly on top of each other.
  • The diameter of the bag bottom should be slightly bigger than the diameter of its intended bottle, at least 1-2 cm. As the bottom piece curves upward and forms the body piece, the effective diameter shrinks a little. How much allowance to give it depends on how snug you want the fit to be. I tend to go for a looser fit, and have a bag that fits rather than risk one that doesn't, after all the time and effort put in.
  • When you finish the bottom piece, the total number of stitches will be the product of the number of starting stitches and the number of rounds. For example, if you start with 8 stitches and work 12 rounds, you will have 96 stitches in the last round. 
  • Depending on the pattern for the bag body, you may need to increase stitches after the last round, to meet the number stitches required for the pattern. I call this round the transitional round. For example, if you have 96 stitches after finishing the bag bottom, and the bag body calls for 104 stitches (for example, 4 repeats of a 26-stitch pattern), increase 8 stitches evenly in the transitional round.
  • I like to start carrying the yarns from round 2. That is, after the magic circle (which is also the first round), I start carrying the yarns. This is so that the stitches' height and fabric thickness are even throughout. The more yarns you carry, the taller the stitches and the thicker the fabric will be.
  • Because the piece is crocheted spirally in the round, color changes may result in color jogs. In some patterns, this can be hidden or masked by making some adjustments to the pattern or choosing a point in the pattern as the start/end of round so that the color change appear intentional. But if the color jog doesn't bother you, it doesn't matter :)
Tapestry crochet bag bottom
My bag bottom is a 9-sided polygon a.k.a. nonagon

The Bag Body


Crocheting the bag body is virtually a no-brainer. After completing the bag bottom and the transitional round, if required, simply continue working the same number of stitches every round, in single crochet spiral, following the pattern for the bag body, until you reach the desired height for the bag.

For me, the one challenge in making the bag body has been adjusting the pattern to minimize color jogs that make the pattern appear "broken".

See this.
Color jog in spiral crochet
Color jog makes the pattern appear broken

I have since learned of ways to work around the problem, though it took me quite a while to wrap my head around them. Even now, I still learn every time I make a piece. Sometimes, I work it out on paper or with software before I start. Other times, I just take a leap of faith and work it out as I go.

To finish the body, you can add some decorative rows like shells or picots, or just keep it plain.

Eyelets for the drawstring and picot finish
I added eyelets for drawstring and finished with picots

The Bag Strap


The bag strap is basically a long, flat rectangle or oblong/oval. In order for the stitches to appear uniform i.e. all same-side stitches appear on one side, I do either of these, depending on the pattern.
  1. Crochet a very long oblong/oval. After the foundation chain, continue working down the chain on the opposite side, without turning. In each round, I add 3 or more stitches evenly at each end of the strap. 
  2. Crochet a very long rectangle. I start with the single crochet foundation stitch chain. The next row and all subsequent rows are crocheted from the same side of the strap. At the end of each row, the yarn is cut. Yes, there is a helluva lot of yarn ends to clean up :(
Thin/narrow straps tend to curl and stretch. To minimize curling, I carry yarns along even when color changes are not required. This also helps to make the strap thicker and sturdier.

The finished strap is sewn to the top of the bag body.

Water bottle holder and strap
Water bottle holder with strap

Making the long bag strap is, by far, the part I enjoy the least in making a tapestry crochet bag. The long foundation chain is a pain to count, and the many pattern repeats agonizingly monotonous. I have yet to find a workable, happy alternative.

Many of the beautiful bag straps (of the Wayuu Mochila) that I see on the web are woven using some sort of loom, or braided, e.g. ply-split braiding. These processes seem tedious and time-consuming but they do yield beautiful, sturdy straps.


Patterns


Despite the multi-color look, only 3 yarns are used at any one time - one working yarn and 2 carried yarns. This is maintained throughout the piece to ensure even thickness.

Bag Bottom
The bottom is a nonagon, i.e. 9-sided polygon. I start with the magic circle with 9 stitches, and increase 9 stitches evenly every round for 13 rounds - 117 stitches. In the transitional round, I increase 3 stitches evenly, to get 120 stitches.

Bag bottom pattern
Bag bottom pattern

Bag Body
Work 10 repeats of the 12-stitch pattern - 120 stitches.

Bag body pattern
Bag body pattern

Eyelets
I use this buttonhole technique to make the eyelets. It doesn't leave any of the carried yarns exposed, like those that involve making chains and skipping stitches do. All carried yarns are nicely hidden under the single crochets.

Crochet button hole / eyelet
Crochet buttonhole / eyelet

Some Helpful Links:

Monday, 10 August 2015

Amigurumi / Crochet Doll

I finished this doll some time ago. Just didn't get around to photographing her until now.

Close up view of Emily - my latest Free Spirit Crochet Doll
Meet Emily - my latest Free Spirit Crochet Doll

Emily, my crochet doll in rainbow dress, pink purse and pink mary janes
Posing in her rainbow dress, pink purse and pink mary janes

As with my other dolls, she is based on Beth Webber's Free Spirit Doll pattern, with some adjustments - a smaller, rounder head with Bleuette's face, eyebrows and mascara. The pattern for the head is here.

She likes pink, even has pink streaks in her hair :) The dress is my own pattern. It is made from variegated rainbow cotton yarn from Daiso. It is constructed top down with just single crochets, with a slit and buttons at the back. 

Crochet doll with blue eyes short blonde and pink hair
She has pink streaks in her hair

Free spirit crochet doll in rainbow dress, purse and mary janes

Monday, 3 August 2015

Crochet Lace Doily

I'm into crochet lace at the moment. The variety of stitches it employs makes the crafting process fun and interesting.

This is a Crochet Lace Doily that I made recently.

Crochet lace doily
Crochet Lace Doily

The pattern chart for this star-centered pineapple net doily is from www.dcrochet.com

Pattern chart for pineapple doily from www.dcrochet.com
Pattern chart for star-centered pineapple net doily

Crochet lace doily
Crochet Lace Doily

Tuesday, 21 July 2015

Crochet Lace Motif Bolero

This is my very first Crochet Lace Motif Bolero, made with Bendigo Woollen Mills Cotton 4-ply in Blush.

Front view of crochet lace motif bolero
Crochet Lace Motif Bolero (Front)
Back view of crochet lace motif bolero
Crochet Lace Motif Bolero (Back)

I wanted something light, loose and airy, ideal to wear over a tank top in hot weather, and this bolero is perfect. The BWM cotton 4-ply is great for crochet - it produces a soft, wearable fabric with a nice drape.

This site www.jessica-tromp.nl, and this page in particular, show you different ways to construct a bolero out of motifs. At first, it looked complex and intimidating, but after a closer look, I learned that motifs are just shapes - squares, rounds, triangles etc., and lace in crochet is simply a combination of chains and basic crochet stitches. The easiest version is probably Bolero Type 5, which is what I went with for my bolero.

For the motif, I found this beautiful, elegant lace motif pattern from this site.

Crochet Lace Motif Pattern

The pieces are joined-as-you-go, so there is no need for seaming or extra stitches to join the squares.

For the edging, I used this lovely, intricate pattern from Fatima Crochet.

Crochet Lace Edging for Bolero
Crochet Lace Edging

Here is a close-up view of one of my motifs.

Close up view of the crochet lace motif square
Crochet Lace Motif Square
Two motif squares joined together
Two joined motif squares

Each square measures approximately 12 cm x 12 cm. The finished bolero is 36 cm wide, and 28 cm from top to bottom.

Monday, 25 May 2015

Crochet Mini Shell Tote

Crochet mini shoulder tote
Crochet Mini Shoulder Tote

This bag was based loosely on Tangled Happy's Spring Inspired Boutique Bags pattern. I started out with the pattern but made quite a few changes along the way. I wanted a bag that can hold things, and be carried on the shoulder - like a mini shoulder tote. So I made it bigger, added a base, and made the strap longer.

About The Pattern

The bag is crocheted in a tube, with the bottom sewn or stitched together at the at end. The shell pattern is basically constructed from multiples of 3 stitches. That forms the basis of the foundation chain - any multiple of 3. For example, a foundation chain of 99 stitches will give you 33 shells. The length of the foundation chain will form the circumference of the bag. So if you want your bag to measure 6 inches in width, the foundation chain should be at least 12 inches.

An alternative is to crochet around the foundation chain, forming the circle right from the base, thus eliminating the need to sew. Make sure the foundation chain is the length of the desired width of the bag, not the circumference.

The instructions for Round 2 of the original pattern is especially confusing.

Rnd 2: Sl St in each dc of shell into sp between first two shells. Work Beginning Shell. {Work Shell in space between next shell.} Repeat between {} to end. Join in top of ch 3. (17 Shells)

After several attempts, I think I finally decoded it. This is what I did:

*Slip stitch in the top of ch3 (of the Beginning Shell) to join the round. Then slip stitch in the next 2 dcs (of the Beginning Shell) until you reach the space between the Beginning Shell and the next Shell. Work Beginning Shell in this space --> this is the beginning shell of the new round. Then work Shell in the space between the next 2 shells, to end* At the end of round, repeat from *.

Normally when you sl st to join stitches in the round, the "seam" is formed on the same stitch column, i.e. the sl st sits on top on the sl st of the previous round. With the method above, the "seam" is more diagonal than straight as the stitches for the new round starts at the space between the first 2 shells rather than directly above the first shell.

For the base, I simply made an oblong piece of single crochets, and sc it to the bottom of the body piece.

Crochet tote with oblong base
Added an oblong-shaped base
Crochet tote - close up view of the shell stitches
Shell stitches

About The Yarn
The yarn I used for this bag is Bendigo Woollen Mills Harmony in Carnation which is a cotton-wool-lycra blend. I had knitted up a top/vest with it, but frogged the whole thing soon after because I didn't like it and would never wear it. The knitted fabric was very thick and heavy, and felt rough on the skin. It didn't have the squishiness of wool nor the smoothness of cotton. Instincts led me to try Harmony on a this bag, and I loved the result! For me, this yarn is perfect for making crochet bags because it produces a thick, sturdy fabric that is essential for bags.

Crochet tote made with Bendigo Woollen Mills Harmony in Carnation
Love the bag!

From the foundation chain of 99 stitches (33 shells around), my bag measures approximately 9.5 inches wide and 8 inches from the bottom to the top center point (excluding the strap).

Tuesday, 3 March 2015

Another Crochet / Amigurumi Doll

 I made another doll based on Beth Webber's Free Spirit Doll pattern.

Free Spirit Amigurumi Doll

I love the Free Spirit Doll pattern. It is easy to follow, and the doll can be done pretty quickly. With her thin long limbs, she can wear clothes without looking bulky. Here, she's wearing a long sleeved tunic and flare pants, patterns adapated from By Hook By Hand. The shoes are adapted from Bleuette's Mary Jane shoes. The Daisy sling tote bag is my own design.

The body is crocheted with Bendigo Woollen Mills Luxury 8 ply in Cream. This wool is so soft and luxurious that I felt bad using it on a doll but I had it in my stash and it does make a beautiful doll. The hair is made from Ice Yarns Alpaca Merino. Not my favourite yarn for doll hair. It is rough and "sticky" - the strands like to stick together, it takes forever to style and seconds to mess up!

The parts of a doll that I always take a long time with are the head and face and oh, the hair. But these are also the most gratifying parts, for they give the doll character and bring it to life. For this doll, I made a slightly smaller and rounder head. I followed Bleuette's face and added eyebrows and more definition/mascara to the eyes :)


Free spirit amigurumi doll with rounder head, eyebrows and mascara
Free Spirit Amigurumi Doll, with rounder head, eyebrows and mascara

Crochet Doll Head Pattern


Rnd 1. Magic ring 6 sts
Rnd 2. Inc 6 sts evenly to 12 sts
Rnd 3. Inc 6 sts evenly to 18 sts
Rnd 4. Inc 6 sts evenly to 24 sts
Rnd 5. Inc 6 sts evenly to 30 sts
Rnd 6. Inc 3 sts evenly to 33 sts
Rnd 7. Inc 3 sts evenly to 36 sts
Rnd 8-15. Work evenly 36 sts
Rnd 16. Dec 3 sts evenly to 33 sts
Rnd 17. Dec 3 sts evenly to 30 sts
Rnd 18. Dec 3 sts evenly to 27 sts
Rnd 19. Dec 9 sts evenly to 18 sts
Rnd 20. Dec 9 sts evenly to 9 sts

I didn't have any wooden spool but I did have dowels. So I made the neck about 3/4 inch long with a dowel in it. Then I inserted the neck into the bottom head opening and sewed them together.

Crochet dolls - Amy and Queenie
Going for a car ride with Amy!

Sunday, 15 February 2015

Crochet / Amigurumi Chinese New Year Doll

Gong Xi Fa Cai! 恭喜发财! Meet Amy, my Chinese New Year Amigurumi Doll.

Amigurumi doll for Chinese New Year
Amigurumi Chinese New Year Doll: Gong Xi Fa Cai!


The pattern is from By Hook, By Hand: Free Spirit Amigurumi Doll Pattern, by Beth Webber. What an amazing and wonderful site this is! Beth makes the most beautiful dolls, and she shares her patterns for free.

The body is done with Bendigo Woollen Mills Luxury 8 ply. The doll has pipe cleaners/wires in its legs and arms that make its limbs bendable, hence the doll is poseable. I used Beth's technique for a movable neck, from her Bleuette Doll Pattern. I also made the head smaller - 36 stitches at its widest circumference instead of 40 stitches that is stated in the pattern, and followed Bleuette's face.

The CheongSam or Qipao (traditional Chinese dress for women) is my own design. The shoes are adapted from Beth's Mary Jane Shoes for Bleuette. Both are crocheted with cotton lace yarn from the local craft store.

Free Spirit Amigurumi Doll in Cheongsam (Qipao)
Free Spirit Amigurumi Doll in CheongSam (Qipao)
Crochet doll, toy goat and mandarin orange
Happy Chinese New Year!

Friday, 6 February 2015

Another Crochet / Amigurumi Baby Groot

This Baby Groot (from Guardians of the Galaxy) is adapted from Twinkie Chan's Baby Groot pattern.

(I have previously made another one based on Smartapple Creations' pattern.)

Crochet / Amigurumi Baby Groot

This was also made with the inexpensive, acrylic Minlon brand yarn. Because the yarn is of DK weight, the pattern when followed exactly, produced a very tiny Baby Groot, and I only had 8mm eyes which were way too big for the tiny head.

After several iterations, this is my final adapted version of the pattern. I used 3.0 mm hook.

Head
Rnd 1: 6 sts magic ring (6)
Rnd 2: Inc 6 sts evenly (12)
Rnd 3: Inc 6 sts evenly (18)
Rnd 4: Inc 6 sts evenly (24)
Rnd 5: Inc 6 sts evenly (30)
Rnd 6: Inc 6 sts evenly (36)
Rnd 7: Inc 3 sts evenly (39)
Rnds 8-13: sc around (39)
*Rnd 14: Dec 3 sts evenly (36)
Continue until you reach the desired length for head, then continue to make the head accents.

*This was completely unnecessary. I was tinkering with the shape and got lazy to frog and redo. I should just continue evenly from Round 7 all the way to achieve a squarer/less rounded head.

Head Accents
I followed the pattern but made them bigger, with 4-6 sts pieces instead of the 3-4 sts in the original pattern.

Body
Rnd 1: 6 sts magic ring (6)
Rnd 2: Inc 6 sts evenly (12)
Rnd 3: Inc 6 sts evenly (18)
Rnd 4: Inc 6 sts evenly (24)
Rnd 5: Inc 6 sts evenly (30)
Rnd 6: Inc 6 sts evenly (36)
Rnds 7-8: Even (36)
Rnd 9: Dec 6 sts evenly (30)
Rnd 10: Dec 6 sts evenly (24)
Rnd 11: Dec 3 sts evenly (21)
Rnds 12-13: Even (21)
Rnd 14: Dec 3 sts evenly (18)
Rnds 15-16: Even (18)
Rnd 17: Dec 3 sts evenly (15)
Continue evenly (15 sts) until desired length.

I put a piece of twisted pipe cleaner in the body, and crochet around it, stuffing as I go. At the top of the neck, I leave about 1.5-2cm piece of the twisted pipe cleaner sticking out, and poke that through the hole in the magic ring of the head, and sew the body to the head.

Arms
I made 6 sts circumference arms.
Chain 6, slip stitch to 1st chain to join, and continue sc around in a spiral until you reach your desired length. Finish off with the fingers, and sew arms to body.

The rest as per original pattern.

If I make this again, I would try a few things differently.

  1. Make the body and head in one piece. After the body, simply increase sts to 18, then 24, and so on for the head. No need to sew.
  2. Squarer head (see note in pattern for head above).
  3. Use Smartapple Creations' pattern for arms. Since the arms are not stuffed, there is no risk of the stuffing showing through, and the ribbing makes them naturally twisty and look vine-like.
Crochet / Amigurumi Baby Groot

Crochet / Amigurumi Baby Groot
We are Groot!