Showing posts with label Doll. Show all posts

Sunday, 25 September 2016

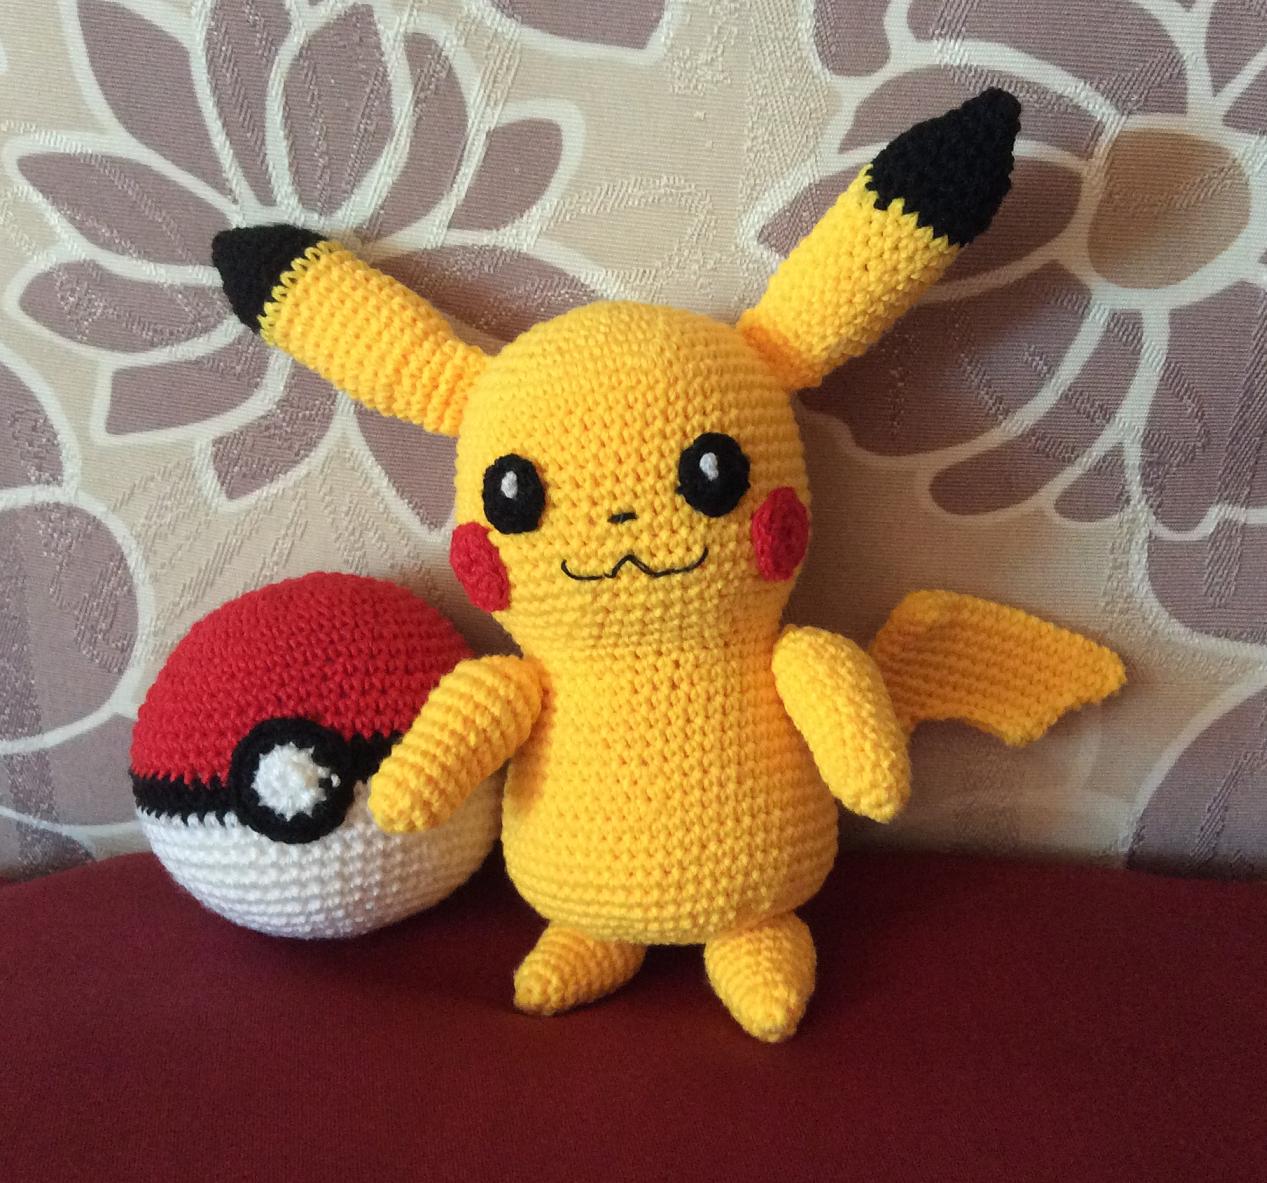
Crochet / Amigurumi Pikachu & Pokéball

Jumping on the Pokémon Go craze bandwagon,  I made these amigurumi Pokémon toys :)

Amigurumi Pokémon toys
Amigurumi Pokémon toys

Crochet Pikachu and Pokéball


Pikachu is based on this amigurumi Pikachu pattern from Sabrina's Crochet. It makes a decent size - big enough as a toy (I can hold the body in my hand) and small enough for the work to be completed in a day or two. I followed the pattern for the head, body, limbs and ears, but crocheted the tail in the round instead of making 2 separate pieces and sewing them together, following the pattern just roughly. The other small details like eyes, cheeks, nose and mouth were made to fit. Love how it turned out :)

The Pokéball is basically a sphere. I used this Ideal Crochet Sphere that truly creates the perfect sphere! Mine is the 30-row ball that turned out a little smaller than a tennis ball. Perfect size for kids to grasp and throw at Pikachu, poor thing :)


Crochet Pikachu toy
Crochet Pikachu toy

Crochet Pikachu toy - back view

Pikachu and Pokéball

Monday, 10 August 2015

Amigurumi / Crochet Doll

I finished this doll some time ago. Just didn't get around to photographing her until now.

Close up view of Emily - my latest Free Spirit Crochet Doll
Meet Emily - my latest Free Spirit Crochet Doll

Emily, my crochet doll in rainbow dress, pink purse and pink mary janes
Posing in her rainbow dress, pink purse and pink mary janes

As with my other dolls, she is based on Beth Webber's Free Spirit Doll pattern, with some adjustments - a smaller, rounder head with Bleuette's face, eyebrows and mascara. The pattern for the head is here.

She likes pink, even has pink streaks in her hair :) The dress is my own pattern. It is made from variegated rainbow cotton yarn from Daiso. It is constructed top down with just single crochets, with a slit and buttons at the back. 

Crochet doll with blue eyes short blonde and pink hair
She has pink streaks in her hair

Free spirit crochet doll in rainbow dress, purse and mary janes

Tuesday, 3 March 2015

Another Crochet / Amigurumi Doll

 I made another doll based on Beth Webber's Free Spirit Doll pattern.

Free Spirit Amigurumi Doll

I love the Free Spirit Doll pattern. It is easy to follow, and the doll can be done pretty quickly. With her thin long limbs, she can wear clothes without looking bulky. Here, she's wearing a long sleeved tunic and flare pants, patterns adapated from By Hook By Hand. The shoes are adapted from Bleuette's Mary Jane shoes. The Daisy sling tote bag is my own design.

The body is crocheted with Bendigo Woollen Mills Luxury 8 ply in Cream. This wool is so soft and luxurious that I felt bad using it on a doll but I had it in my stash and it does make a beautiful doll. The hair is made from Ice Yarns Alpaca Merino. Not my favourite yarn for doll hair. It is rough and "sticky" - the strands like to stick together, it takes forever to style and seconds to mess up!

The parts of a doll that I always take a long time with are the head and face and oh, the hair. But these are also the most gratifying parts, for they give the doll character and bring it to life. For this doll, I made a slightly smaller and rounder head. I followed Bleuette's face and added eyebrows and more definition/mascara to the eyes :)


Free spirit amigurumi doll with rounder head, eyebrows and mascara
Free Spirit Amigurumi Doll, with rounder head, eyebrows and mascara

Crochet Doll Head Pattern


Rnd 1. Magic ring 6 sts
Rnd 2. Inc 6 sts evenly to 12 sts
Rnd 3. Inc 6 sts evenly to 18 sts
Rnd 4. Inc 6 sts evenly to 24 sts
Rnd 5. Inc 6 sts evenly to 30 sts
Rnd 6. Inc 3 sts evenly to 33 sts
Rnd 7. Inc 3 sts evenly to 36 sts
Rnd 8-15. Work evenly 36 sts
Rnd 16. Dec 3 sts evenly to 33 sts
Rnd 17. Dec 3 sts evenly to 30 sts
Rnd 18. Dec 3 sts evenly to 27 sts
Rnd 19. Dec 9 sts evenly to 18 sts
Rnd 20. Dec 9 sts evenly to 9 sts

I didn't have any wooden spool but I did have dowels. So I made the neck about 3/4 inch long with a dowel in it. Then I inserted the neck into the bottom head opening and sewed them together.

Crochet dolls - Amy and Queenie
Going for a car ride with Amy!

Sunday, 15 February 2015

Crochet / Amigurumi Chinese New Year Doll

Gong Xi Fa Cai! 恭喜发财! Meet Amy, my Chinese New Year Amigurumi Doll.

Amigurumi doll for Chinese New Year
Amigurumi Chinese New Year Doll: Gong Xi Fa Cai!


The pattern is from By Hook, By Hand: Free Spirit Amigurumi Doll Pattern, by Beth Webber. What an amazing and wonderful site this is! Beth makes the most beautiful dolls, and she shares her patterns for free.

The body is done with Bendigo Woollen Mills Luxury 8 ply. The doll has pipe cleaners/wires in its legs and arms that make its limbs bendable, hence the doll is poseable. I used Beth's technique for a movable neck, from her Bleuette Doll Pattern. I also made the head smaller - 36 stitches at its widest circumference instead of 40 stitches that is stated in the pattern, and followed Bleuette's face.

The CheongSam or Qipao (traditional Chinese dress for women) is my own design. The shoes are adapted from Beth's Mary Jane Shoes for Bleuette. Both are crocheted with cotton lace yarn from the local craft store.

Free Spirit Amigurumi Doll in Cheongsam (Qipao)
Free Spirit Amigurumi Doll in CheongSam (Qipao)
Crochet doll, toy goat and mandarin orange
Happy Chinese New Year!

Friday, 6 February 2015

Another Crochet / Amigurumi Baby Groot

This Baby Groot (from Guardians of the Galaxy) is adapted from Twinkie Chan's Baby Groot pattern.

(I have previously made another one based on Smartapple Creations' pattern.)

Crochet / Amigurumi Baby Groot

This was also made with the inexpensive, acrylic Minlon brand yarn. Because the yarn is of DK weight, the pattern when followed exactly, produced a very tiny Baby Groot, and I only had 8mm eyes which were way too big for the tiny head.

After several iterations, this is my final adapted version of the pattern. I used 3.0 mm hook.

Head
Rnd 1: 6 sts magic ring (6)
Rnd 2: Inc 6 sts evenly (12)
Rnd 3: Inc 6 sts evenly (18)
Rnd 4: Inc 6 sts evenly (24)
Rnd 5: Inc 6 sts evenly (30)
Rnd 6: Inc 6 sts evenly (36)
Rnd 7: Inc 3 sts evenly (39)
Rnds 8-13: sc around (39)
*Rnd 14: Dec 3 sts evenly (36)
Continue until you reach the desired length for head, then continue to make the head accents.

*This was completely unnecessary. I was tinkering with the shape and got lazy to frog and redo. I should just continue evenly from Round 7 all the way to achieve a squarer/less rounded head.

Head Accents
I followed the pattern but made them bigger, with 4-6 sts pieces instead of the 3-4 sts in the original pattern.

Body
Rnd 1: 6 sts magic ring (6)
Rnd 2: Inc 6 sts evenly (12)
Rnd 3: Inc 6 sts evenly (18)
Rnd 4: Inc 6 sts evenly (24)
Rnd 5: Inc 6 sts evenly (30)
Rnd 6: Inc 6 sts evenly (36)
Rnds 7-8: Even (36)
Rnd 9: Dec 6 sts evenly (30)
Rnd 10: Dec 6 sts evenly (24)
Rnd 11: Dec 3 sts evenly (21)
Rnds 12-13: Even (21)
Rnd 14: Dec 3 sts evenly (18)
Rnds 15-16: Even (18)
Rnd 17: Dec 3 sts evenly (15)
Continue evenly (15 sts) until desired length.

I put a piece of twisted pipe cleaner in the body, and crochet around it, stuffing as I go. At the top of the neck, I leave about 1.5-2cm piece of the twisted pipe cleaner sticking out, and poke that through the hole in the magic ring of the head, and sew the body to the head.

Arms
I made 6 sts circumference arms.
Chain 6, slip stitch to 1st chain to join, and continue sc around in a spiral until you reach your desired length. Finish off with the fingers, and sew arms to body.

The rest as per original pattern.

If I make this again, I would try a few things differently.

  1. Make the body and head in one piece. After the body, simply increase sts to 18, then 24, and so on for the head. No need to sew.
  2. Squarer head (see note in pattern for head above).
  3. Use Smartapple Creations' pattern for arms. Since the arms are not stuffed, there is no risk of the stuffing showing through, and the ribbing makes them naturally twisty and look vine-like.
Crochet / Amigurumi Baby Groot

Crochet / Amigurumi Baby Groot
We are Groot!

Crochet / Amigurumi Baby Groot

This is my amigurumi Baby Groot (character from Guardians of the Galaxy), based on the free pattern by Smartapple Creations.

Crochet / Amigurumi Baby Groot

Since this was my first Baby Groot, I used the local Malaysian made acrylic Minlon brand yarn. It's acrylic, DK weight and really inexpensive at only 2 ringgit (about 50 US cents) per roll of 40gm. This yarn is very rough and scratchy, and falls apart when worked on too much. But it is very cheap. I use it for experiments, prototypes, and for making things that won't get handled too much or worn next to the skin.

I really like the ribbed look on the body and arms that was achieved through crocheting through Back Loops Only and combination of hdc, sc and sl st - very clever. Gives it a natural vine-like look.

When I first finished the body, I was worried about holes. The fabric was stretchier than normal because of the BLO, and when I turned the piece to increase stitches for the head, the holes were enormous no matter how I winged it! In the end, I decided to make the head separately and sew it to the body instead.

The rest were all done as per pattern.

Crochet / Amigurumi Baby Groot
We are Groot!

The one on the right is based on Twinkie Chan's free pattern - more here.
Which Baby Groot do you like?